How To: Install Android 7.0 Nougat on Your Nexus Right Now
Android 7.0 Nougat has finally arrived—well, technically, it's in the process of arriving on Nexus devices across the globe. Google uses a staged rollout system to prevent excessive server load when issuing Android updates, which means even though Nougat has made its official debut already, you might not get that "Update available" notification for another few weeks.Don't Miss:Nougat Has Finally Turned Android into a True Multitasking MasterBut if you have a few minutes to spare, you don't have to wait to get awesome functionality like split-screen mode and quick reply—instead, you can simply sideload the OTA (short for "over-the-air update") to get Nougat right now. This OTA .zip file is the same exact update you'd get if you waited on the staged rollout, and you don't even need to be rooted to install it.Of course, this only applies to Nexus devices and the Pixel C, as other smartphones and tablets won't get the Nougat update for another few months. But it's a quick and painless process, and all you need is a computer with a USB data cable to get started.Don't Miss: How to Install Android 7.0 Nougat on Your Nexus if You're Rooted
What You'll NeedNexus 6, Nexus 9, Nexus Player, Nexus 5X, Nexus 6P, or Pixel C latest version of Marshmallow installed (6.0.1 with July 2016 security patches) non-rooted device (rooted users see this guide) Windows PC (recommended) USB data cable
Step 1: Set Up ADBFirst, you'll need to install ADB and all of the relevant drivers on your computer. We recommend a Windows PC for this part, as the easiest method is to use a Windows-exclusive program called Minimal ADB and Fastboot. To start with that, simply download the Minimal ADB and Fastboot executable, then launch the file and follow the prompts for installation. When you're done there, install the ADB drivers, then restart your computer.Note that this would still be possible with a Mac or a Linux machine, but you'd have to install the entire Android SDK, and the installation directories would be different than those shown below.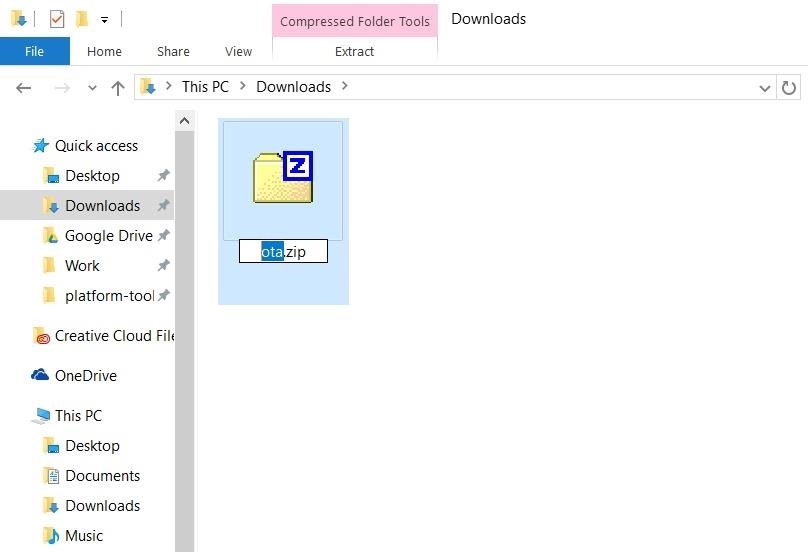
Step 2: Download the OTA Update ZIP & RenameNext, grab the OTA .zip file that will update your device from Marshmallow to Nougat. Just in case you missed it in the "What You'll Need" section up top, these OTA .zips will only work if you're running Marshmallow 6.0.1 with the July 2016 security patches. These files are device-specific, so make sure to download the right one, and save it to your computer.Nexus 6 OTA ZIP (not yet available) Nexus 9 (Wi-Fi) OTA ZIP Nexus 9 (LTE) OTA ZIP (not yet available) Nexus Player OTA ZIP Nexus 5X OTA ZIP Nexus 6P OTA ZIP Pixel C OTA ZIP Once you've done that, rename the file to simply ota.zip. Or, if you have file extensions hidden and can't already see the "zip" part in the name, just rename to ota.
Step 3: Move the OTA Update ZIPFrom here, transfer the ota.zip file to your ADB installation directory. With Minimal ADB and Fastboot, that will be the C:\Program Files (x86)\Minimal ADB and Fastboot folder—so just copy the ota.zip file from your Downloads folder, then paste it right in here. For Mac and Linux users, this depends on where you installed the Android SDK in the first place. However, the easiest way to find the location is to search your computer for a folder named "platform-tools," then move the ota.zip file here.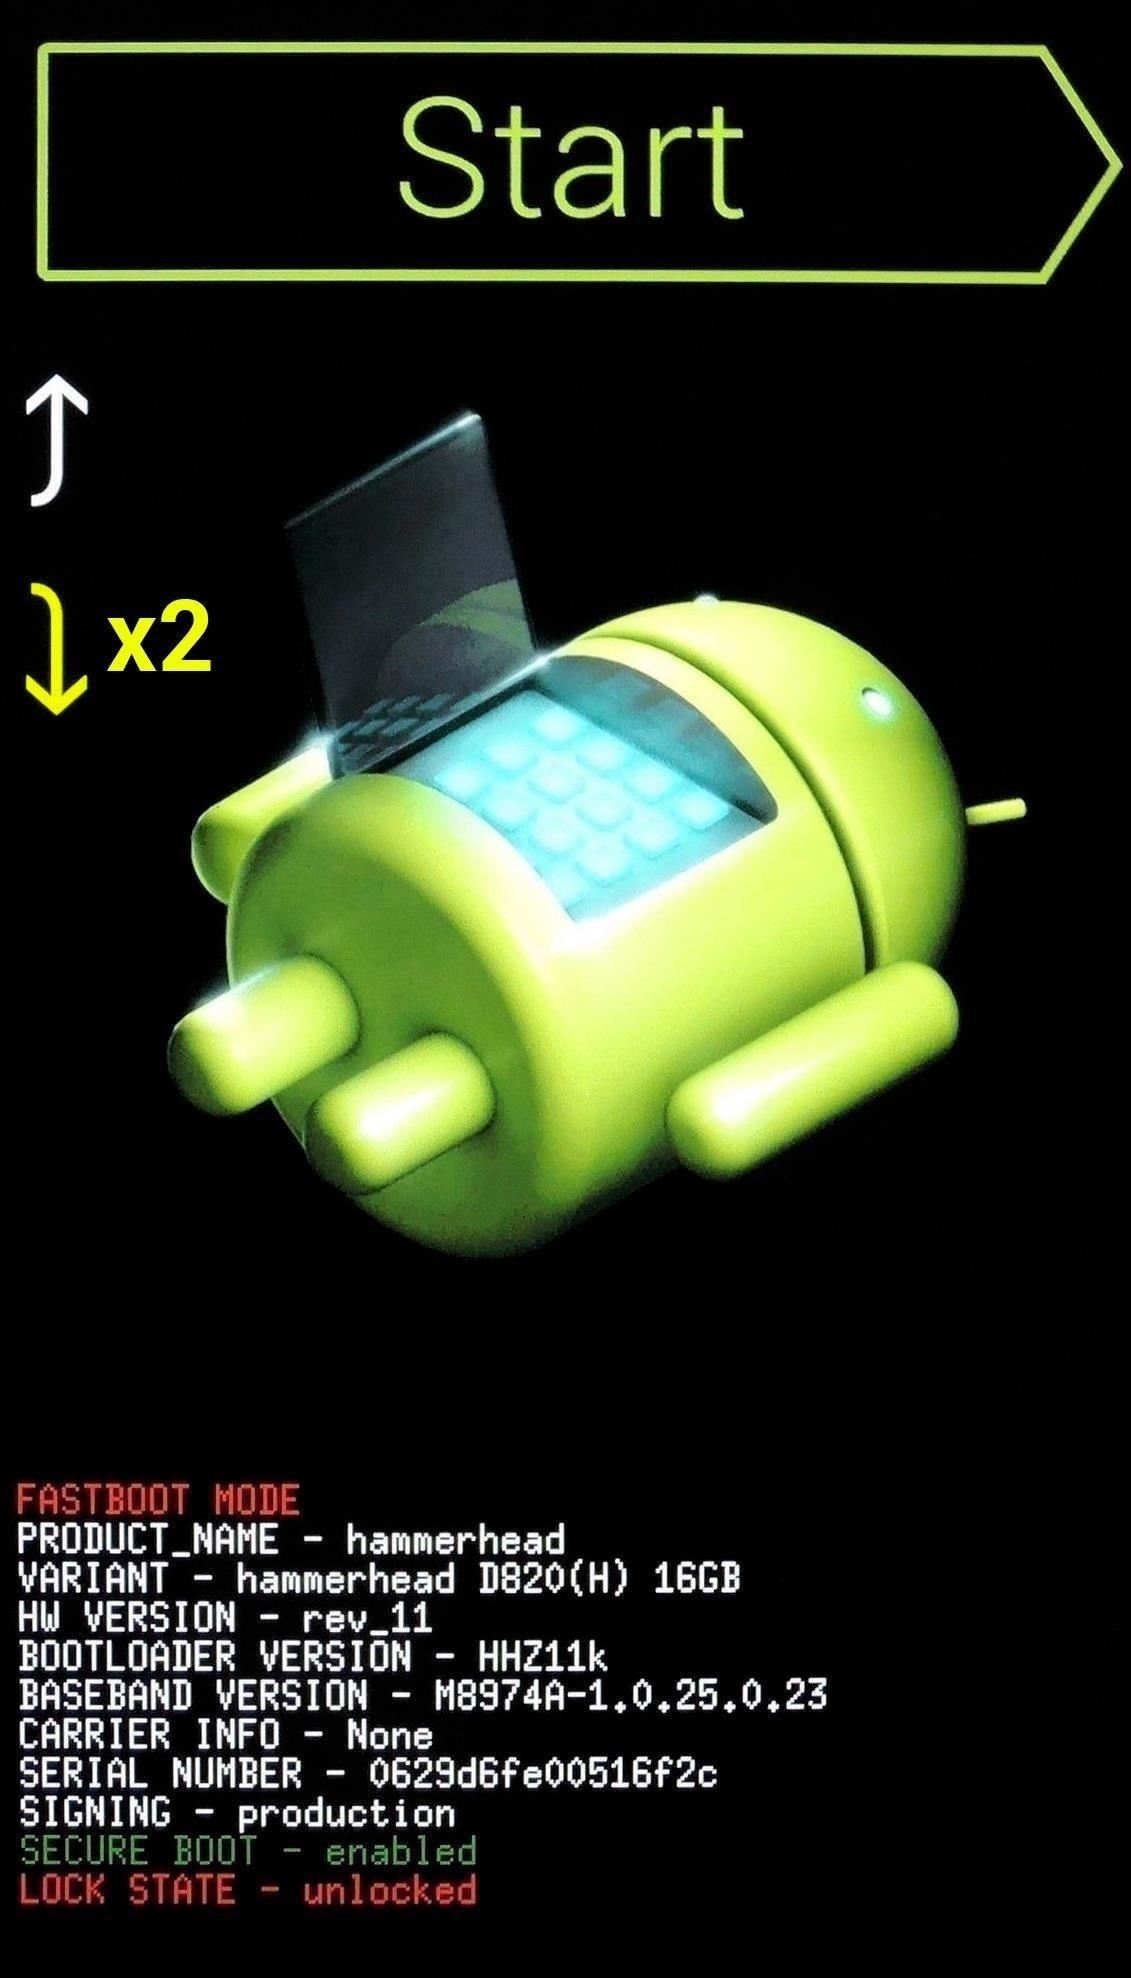
Step 4: Boot Your Phone into Recovery ModeNext up, power your Nexus or Pixel device completely off. When the screen goes black, press and hold the volume down and power buttons simultaneously. This will put your device into bootloader mode—from here, tap the volume down button twice to highlight the "Recovery mode" option, then press the power button to select it.
Step 5: Prepare for SideloadingOnce you've done that, you'll see a screen with an Android logo and the text "No command." From here, hold down the power button, then press the volume up button. Within a few seconds, you'll be greeted by Android's stock recovery menu—from here, use the volume down button to highlight "Apply update from ADB," then press the power button to select it.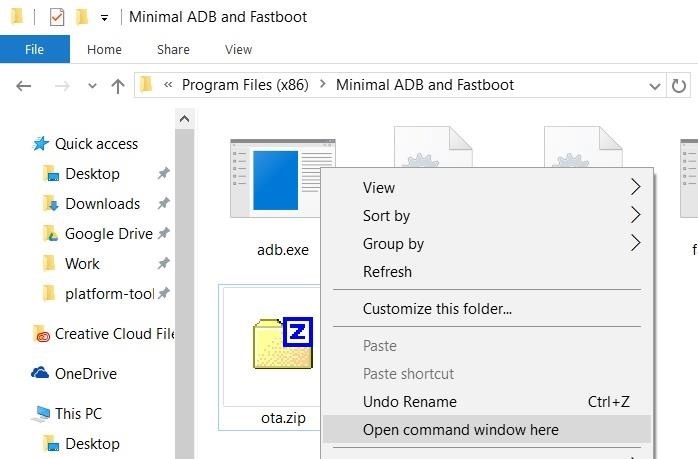
Step 6: Sideload the OTA with ADBNext, plug your phone into your computer with a USB data cable, then navigate to the ADB installation directory (C:\Program Files (x86)\Minimal ADB and Fastboot for Windows). After that, hold down the shift button on your keyboard, then right-click any empty space in this folder and choose "Open command window here."Note: Mac and Linux users will have to open a Terminal window first, then manually navigate to the ADB installation directory using change directory commands. From here, type adb devices into the command prompt, then press enter. If you see a series of letters and numbers, followed by the word "sideload," that means you're good to go. Otherwise, you'll need to check your ADB and driver installation again.Next, type adb sideload ota.zip into the command prompt, then hit enter. This will start the update process immediately, so make sure that the USB cable doesn't get unplugged. When the process is finished, the command line will say "Total xfer," and your Android device will say "Install from ADB complete."
Step 7: RebootOnce installation has completed, use your volume buttons to highlight the "Reboot system now" option, then press your power button to select it. Within a few minutes, your device will finish booting, and you'll be running Android Nougat. First boot may take longer than normal, so be patient—but once you're up and running, take a second to check out all of Nougat's new features below.Don't Miss: 25 Cool New Things You Can Do with Android NougatFollow Gadget Hacks on Facebook, Twitter, Google+, and YouTube Follow Apple Hacks on Facebook and Twitter Follow Android Hacks on Facebook and Twitter Follow WonderHowTo on Facebook, Twitter, and Google+
Cover photo and screenshots by Dallas Thomas/Gadget Hacks
Apple has not included configuration profiles for the developer beta yet, and many developers are having issues installing iOS 13 even with macOS 10.15 Catalina installed. Plus, since this is the first beta, there are a lot of problems with old and new features to work the kinks out of.
Apple Releases Fifth Developer Beta of iOS 12.2 [Update
Siri isn't the brightest bulb in the box and she often misunderstands unusual words and names. Fortunately, you can teach her how to speak properly by adding phonetic pronunciations to your contacts.
Teach Siri How To Pronounce Contact Names Correctly In iOS 7
The horizontal dotted icon in your iPhone's status bar serves as an indicator of your device's network strength. And while it does help provide an approximation of how strong your signal is, swapping it out to display an actual numeric value is a lot more precise and can change up the look of your iPhone (or at least the status bar).
How To: Boost Performance & Battery Life on Your Galaxy S5 with These "Build.prop" Hacks How To: Enable Free WiFi Tethering on Android Marshmallow How To: Make a Cheap & Easy Prop Skull News: Android's Best Build.Prop Tweaks for Better Speed, Battery Life, & Customization
How to Enable the Built-in Screen Recorder on Android 10
Selling over 5.5million copies since its release in 2000, FINAL FANTASY IX proudly returns on iOS! Now you can relive the adventures of Zidane and his crew in the palm of your hands! Enjoy this classic FINAL FANTASY experience with no additional fees or purchases. Story
Live Translation gives you real-time text translation when you open your camera and focus it on a sign, a menu, or other documents in a foreign language. It can translate to and from a wide range of languages. To use Live Translation, open the Camera app, select Auto mode, and tap the Bixby Vision button.
News: Here Are All the Things in You Can Do in Augmented
Report Ad
Check Out Lightsaber Fx on eBay. Fill Your Cart With Color Today!
In the new App Store, I hid a free App (Word Connect) after I upgraded to iOS 11 on my iPhone 7. When I checked my purchased Apps, it was no longer included in my "purchased" list. After I could find no way to unhide it, I went to the App Store and downloaded it again. Even though the App shows up on my iPhone, when I look at my purchased Apps
How to hide and unhide apps from your iPhone's purchased list
WiFi Prank: Use the iOS Exploit to Keep iPhone Users Off the
This procedure covers one commonly used method for removing surface mount Gull Wing components. Note The goal when removing any component is to remove the component as quickly as possible. Minimum Skill Level - Advanced Recommended for technicians with soldering and component rework skills and exposure to most repair/rework procedures, but
Component Removal, Surface Mount Gull Wing Components, C
Now you can set a new password on your device and upgrade to iOS 11 if necessary. Way 4: Erase iPhone from iCloud to Bypass iOS 11 Password. If the "Find My iPhone" feature is enabled on your iPhone or iPad, you can use it to bypass iPhone lock screen on iOS 11 without Siri or SIM card.
How to Enable "Slide to Unlock" in iOS 10 on iPhone and iPad
This is a video posted by Steven Shizzle and it is about how to delete one's account on the social networking site called MySpace. The creators of MySpace have placed the 'Delete Account' option in a rather tricky place, making it extremely difficult for the average user to delete his/her account.
How to Cancel Your MySpace Account: 7 Steps (with Pictures)
0 comments:
Post a Comment