How To: Theme the Android System UI on Your Nexus 5
When it comes to theming your Android device, it's the little touches that count the most. That's why developer SArnab created the Android Theme Engine, an Xposed Module to theme those hard-to-reach corners of the Android System that often go untouched with other themes.So, if you've ever had a hankering to theme things like power menu icons and status bar elements, you should definitely give this one a try. While the module is still in its early development stages, it can already add quite a bit of personal flair to your device, and more theming options are rolling in fast.Theming with Android Theme Engine is a breeze, too—just make sure you're rooted with the Xposed Framework installed and Unknown Sources enabled. Please enable JavaScript to watch this video.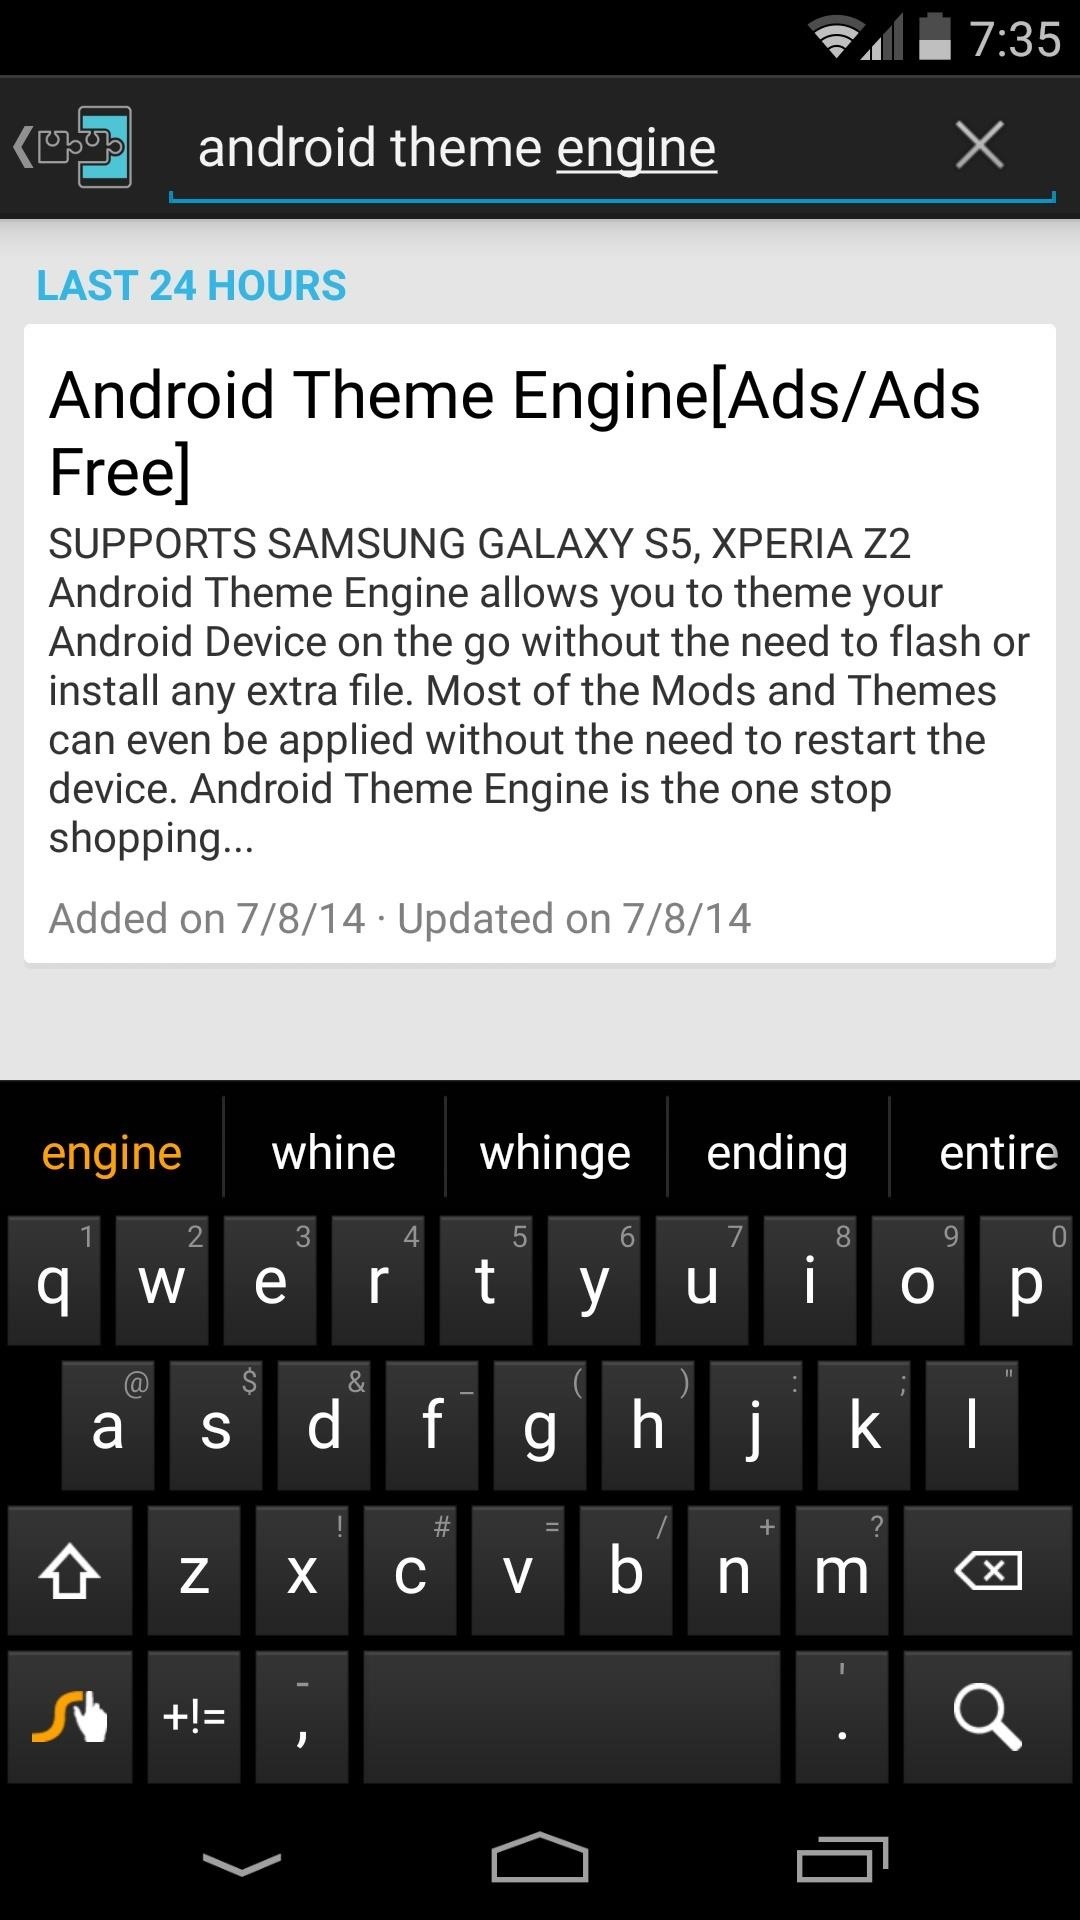
Step 1: Install Android Theme EngineSArnab's Xposed Module can be installed like any other—just head to the Download section of your Xposed Installer app to begin. From here, search Android Theme Engine and tap the top result. Swipe over to the Versions tab, then hit the Download button on the most recent entry to launch the installer. Next, tap Install on the following screen. When it's finished with that, you'll get a notification from Xposed that tells you the module you just installed needs to be activated. So tap the Activate and Reboot button, and Xposed will take care of the rest.
Step 2: Disable Ads (Optional)When you get back up, you'll notice that Android Theme Engine is ad-supported. This is evidenced by a floating sidebar that shows a tray of ads when tapped. But the developer has been kind enough to offer you an option to disable these ads. Keep in mind though, that this is how the project is funded, so consider leaving some of the less intrusive ads enabled.When you first launch Android Theme Engine, the app will ask for Superuser privileges. Hit the Grant button on this pop-up. Next, tap the Settings button near the top-right of the app's main screen. Towards the bottom of this menu, you'll find all of the different types of ads the module uses. Just untick the boxes next to any types of ads that you'd no longer like to see, and they'll immediately disappear.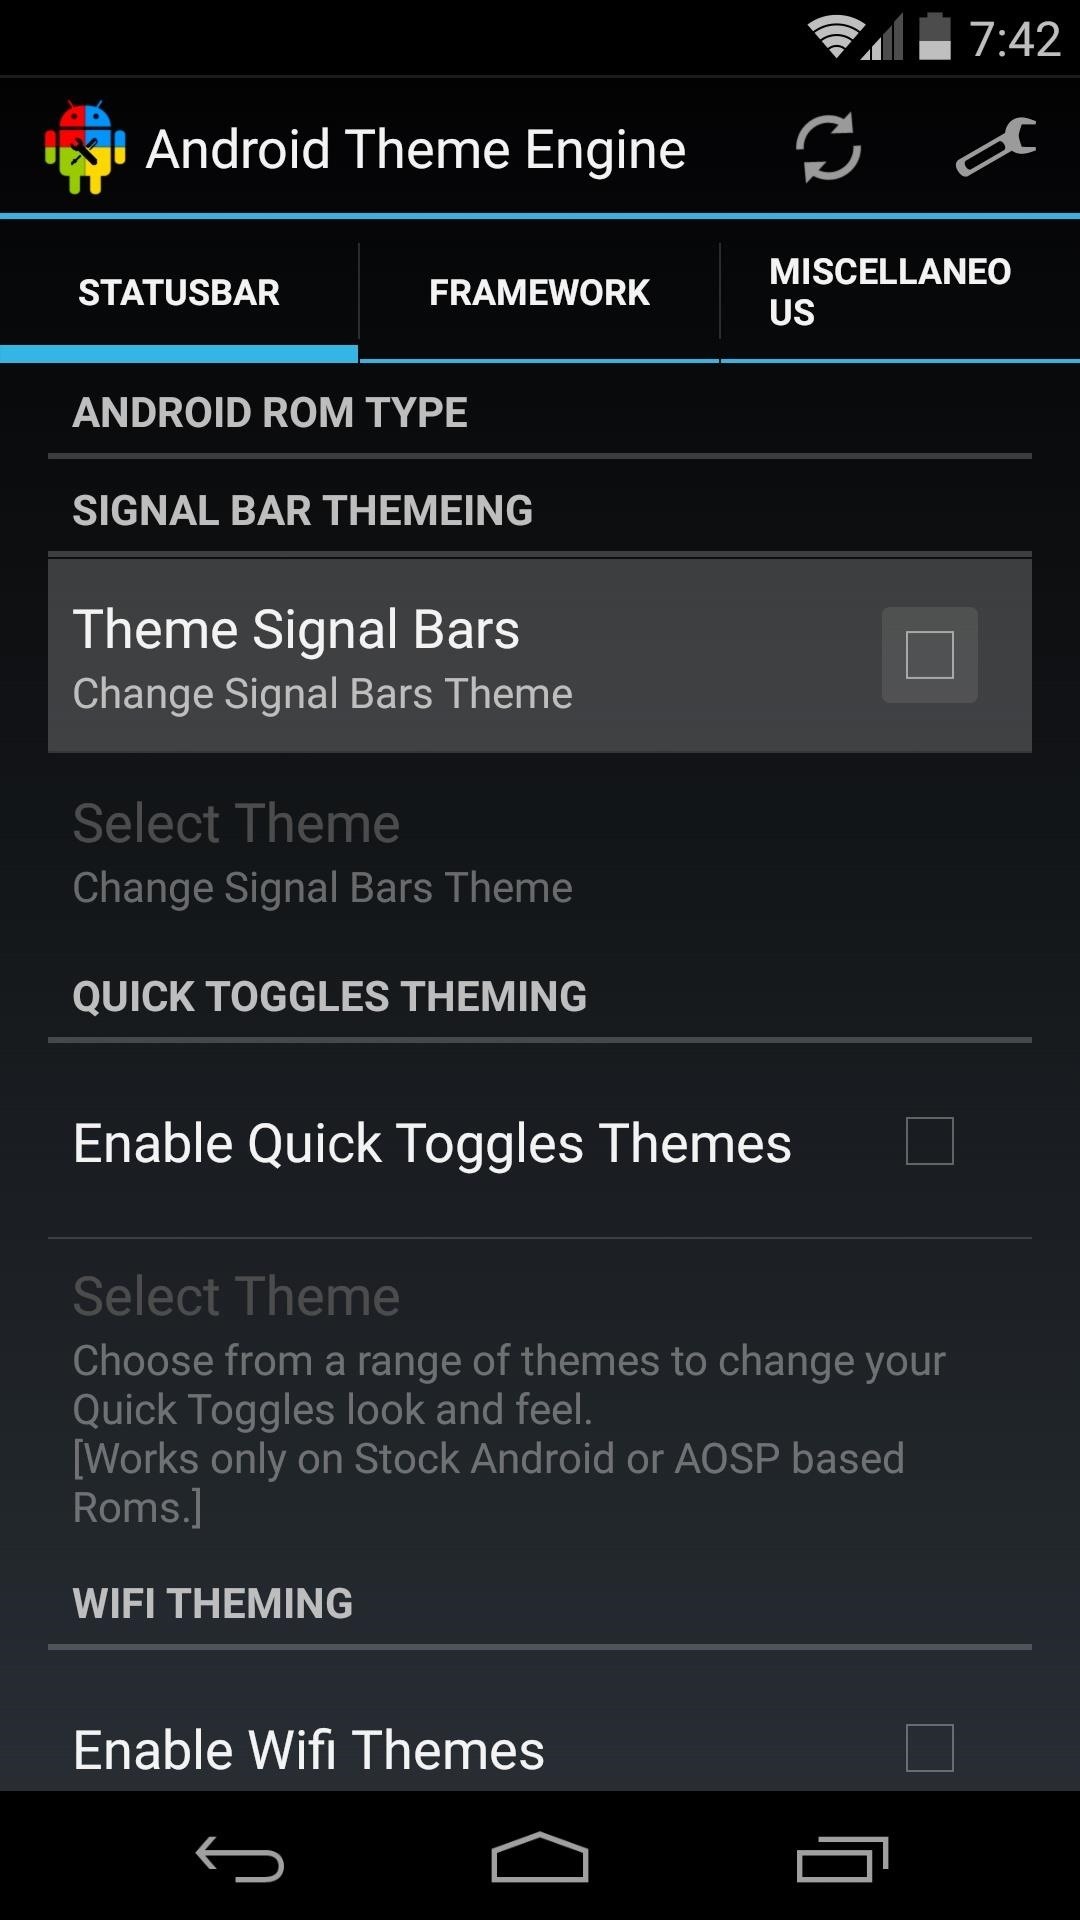
Step 3: Theming Various Aspects of the System UIStarting from the top, you can enable Signal Bars theming by ticking the first box. This opens up the next menu item, Select Theme, so tap that. Here, you'll get a list of all the available signal bar icons that you can apply to your phone's status bar. Choose the one that looks best to you. This method of enabling a theme—via the first check box, then selecting the theme you want to apply—is the same throughout Android Theme Engine. As such, I'll simply highlight the rest of the options for you. Note that some of these options might not work on every different phone model and ROM, but I can show you the ones I've had success with on my Nexus 5 running stock Android.Next, you can try enabling Quick Toggles Themes, but I haven't had much success with this option yet. The same goes for Wifi Themes, though I was able to get this one working on a Galaxy S5. Next, if you head to the Framework tab, you can access even more theming options. Power Menu Icons will theme the icons that appear when you long-press the power button on your Nexus 5. Various themes are available that can change the look of the toggle switches throughout the OS, but some are not compatible with the Nexus 5. If you head to the Miscellaneous tab, you'll find some of the more fun theming options. You can opt to Show Clock in Lock Screen Status Bar, and you can even change the color of the system clock that appears at the top of every screen, or hide it altogether. Tick the box next to Enable Custom Text On Status Bar to open up the option that will allow you to type any text that will appear inside of your status bar. This text can be centered on the left edge of the status bar, or even replace the system clock. When you're satisfied with your selections, tap the Refresh icon at the top of the screen. This will restart the System UI so that your changes can come into effect. Some options in Android Theme Engine theme elements outside of the System UI, so if you notice anything missing, you might have to perform a reboot. When you get back up, you'll find all of your finishing touches applied. What items did you decide to theme? Let us know in the comments section below.
Wonder How To is your guide to free how to videos on the Web. Search, Browse and Discover the best how to videos across the web using the largest how to video index on the web. Watch the best online video instructions, tutorials, & How-Tos for free. Have your own how to videos? Submit them to share with the world.
Write your message. At the top of the page, tap Send . Tip: To add formatting, like bolding or changing the text color, select the text you want to format, then tap . Recall a message using Undo Send. Right after you send a message, you'll see the message "Sent" and the option to Undo. Tap Undo. Options for adding message recipients
How to Recall an Email in Gmail - Solve Your Tech
Instead of just archive and delete, you can move, archive, mark, or snooze your messages with simple gestures. Here's how to customize Gmail swipe actions on iPhone. Customize Gmail swipe actions. Open the Gmail app on your iPhone and then follow these steps to customize your swipe actions. 1) Tap the button on the top left to open the side menu.
Change Gmail Default Swipe Action From Archive To Delete
Apple on Monday released the second beta build of iOS 12.4 for testing by developers and public beta testers. The second developer beta of iOS 12.4 is build number 16G5027i, which replaces build number 16G5027g. (Via AppleInsider) It isn't clear at the moment what major new features may be
News: Apple Releases 'Second' iOS 12.4 Public Beta for iPhone
iTools software from ThinkSky is a free download for Windows PCs that requires no special cable to mirror an Apple device's screen to a computer. iTools can use iPad's, iPhone's, or iPod touch's USB charge/sync cable to grab the connected device's screen and show it on your computer.
How to Remove an iPhone or iPod Touch password « iOS & iPhone
If you're looking for a more traditional, do-it-yourself method, you can split your file up into smaller parts. For example, if you had a 50MB file you wanted to email—or even a collection of large files—you could use a file compression program like 7-Zip to create an archive, and then split the archive into five 10MB pieces.
How to Break a PDF File Into Parts | It Still Works
Pusher's Beams SDKs and API make it easy to send push notifications to all of your iOS and Android users with one request.. The service manages your app credentials and the lifecycle of device tokens which are both required for every request to the Apple Push Notification service (APNs) and FCM for your Android devices.
How to Only Get Notifications for Emails You Care About on
Credit: LDProd/Shutterstock.com Before you decide that it's time to start shopping for a new smartphone, give these five tips a try. In less than 5 minutes, your phone could be back up to speed.
Battery Life & Charging - Samsung Galaxy S 4 Review - Part 1
For Samsung phones with a physical home button, you can use the home + power button combo to take screenshots. Just press the two buttons simultaneously until the sides of the screen flash and you
How To Take Screenshot Without Buttons On Android, iPhone
How to Maximize the Speed of Your Internet Connection
Do you like Samsung's TouchWiz and the iPhone's user interface, but wish you could bring the best of both worlds together onto your device? You can! MIUI (pronounced me-you-eye) is a heavily modded custom ROM that brings a different UI experience never before seen on stock Android devices.
Exclusive: Dual-Boot iOS 8 on Your Android Phone (4.0
If using CWM recovery, use "install zip" menu to find the SuperSU zip file you copied over earlier and use "install" option for TWRP. Then install/flash the SuperSU zip file. Step 15. Reboot your Moto X (or other Motorola device) and you should find a new app called "SuperSU" in your app drawer.
The Guide to All Things Root Related - Motorola Droid
0 comments:
Post a Comment