How To: The Complete Guide to Flashing Factory Images on Android Using Fastboot
If your phone has an unlocked bootloader, you can use Fastboot commands to flash factory images. That may sound like a bunch of technical jargon, but when it comes down to it, this is the best method for updating a rooted device, fixing a bricked phone, reverting to stock, or even getting new Android updates before everyone else.Much like ADB, Fastboot is a very powerful Android utility that accepts commands through a terminal shell. But if that sounds intimidating, don't worry—because once you've learned your way around things, you'll know so much more about the inner workings of Android, as well as how to fix most common problems.Don't Miss: Know Your Android Tools: What is Fastboot & How do You Use It?
A Note About Samsung DevicesThe process outlined below will work for most Nexus, Pixel, HTC, and Motorola devices, as well as phones and tablets from many other manufacturers. However, Samsung devices use their own firmware-flashing software, so Fastboot isn't the way to go if you own a Galaxy. Instead, it's best to use Odin to flash firmware on a Samsung device, and we've covered that process at the following link.Don't Miss: How to Flash Stock Firmware on Your Samsung Device Using Odin
Step 1: Install ADB & Fastboot on Your ComputerFirst, you'll have to install ADB and Fastboot on your computer, which are the utilities that let you flash images using Fastboot commands. There are several "one-click" and "light" versions of ADB and Fastboot made by third-parties, but I wouldn't recommend using these because they're not updated as frequently as the official utilities, so they might not be fully compatible with newer devices.Instead, your best bet is to install either the Android SDK Tools, which contains ADB and Fastboot, or just ADB and Fastboot, from Google. No matter if you choose the full package or just the platform tools themselves, they're the real deal. I've outlined the install process for Windows, Mac, and Linux in Method 1 at the following guide, so head over there to get started.Don't Miss: How to Install ADB & Fastboot on Windows, Mac, or Linux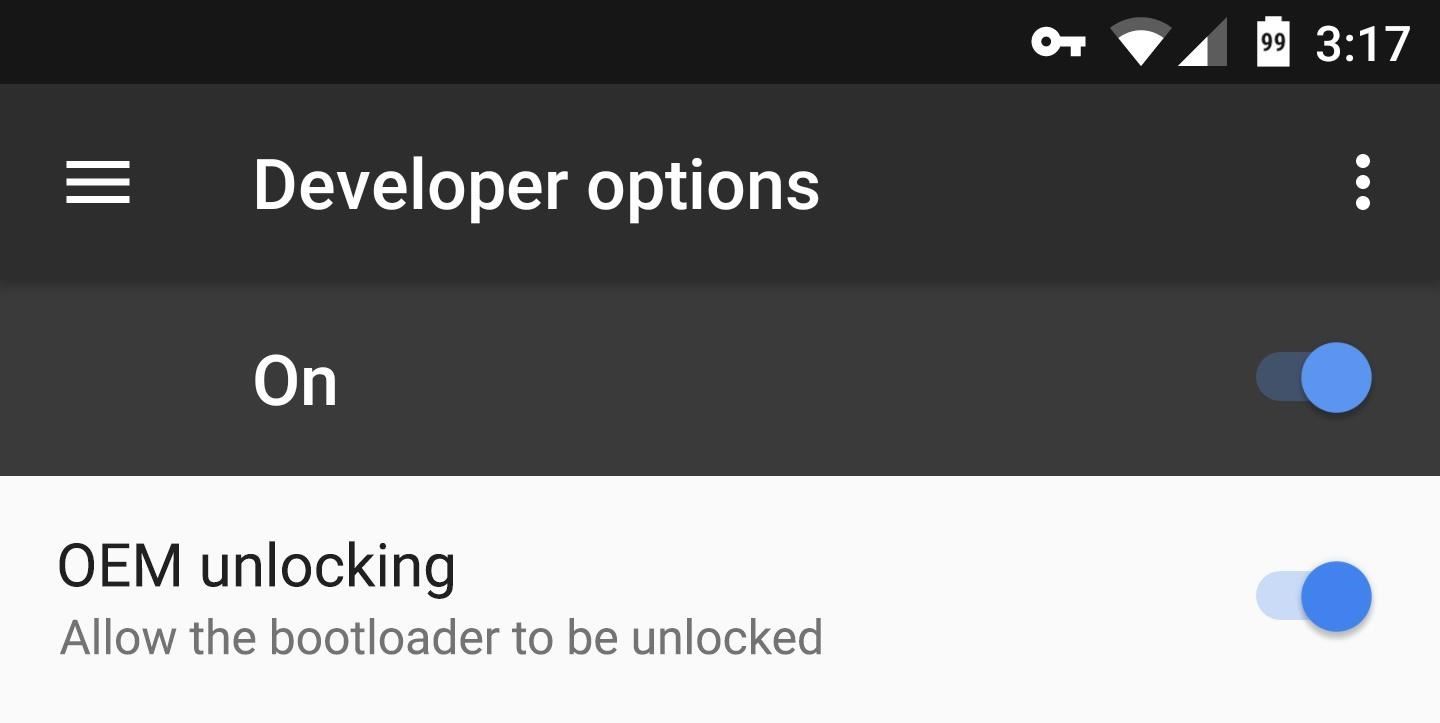
Step 2: Enable OEM UnlockingIn order to flash images using Fastboot, your device's bootloader will need to be unlocked. If you've already done this, you can skip ahead to Step 3.But before you can unlock your bootloader, there's a setting that you'll need to enable if your device shipped with Android Marshmallow or higher preinstalled. To access this setting, start by enabling the Developer options menu on your phone or tablet. Once you've done that, open the Developer options menu, then enable the switch next to "OEM unlocking," and you'll be good to go. If this option is not present on your device, it's likely that your device didn't ship with Android Marshmallow or higher preinstalled. However, if the option is present but grayed out, this usually means that your bootloader cannot be unlocked, which means you won't be able to flash images using Fastboot.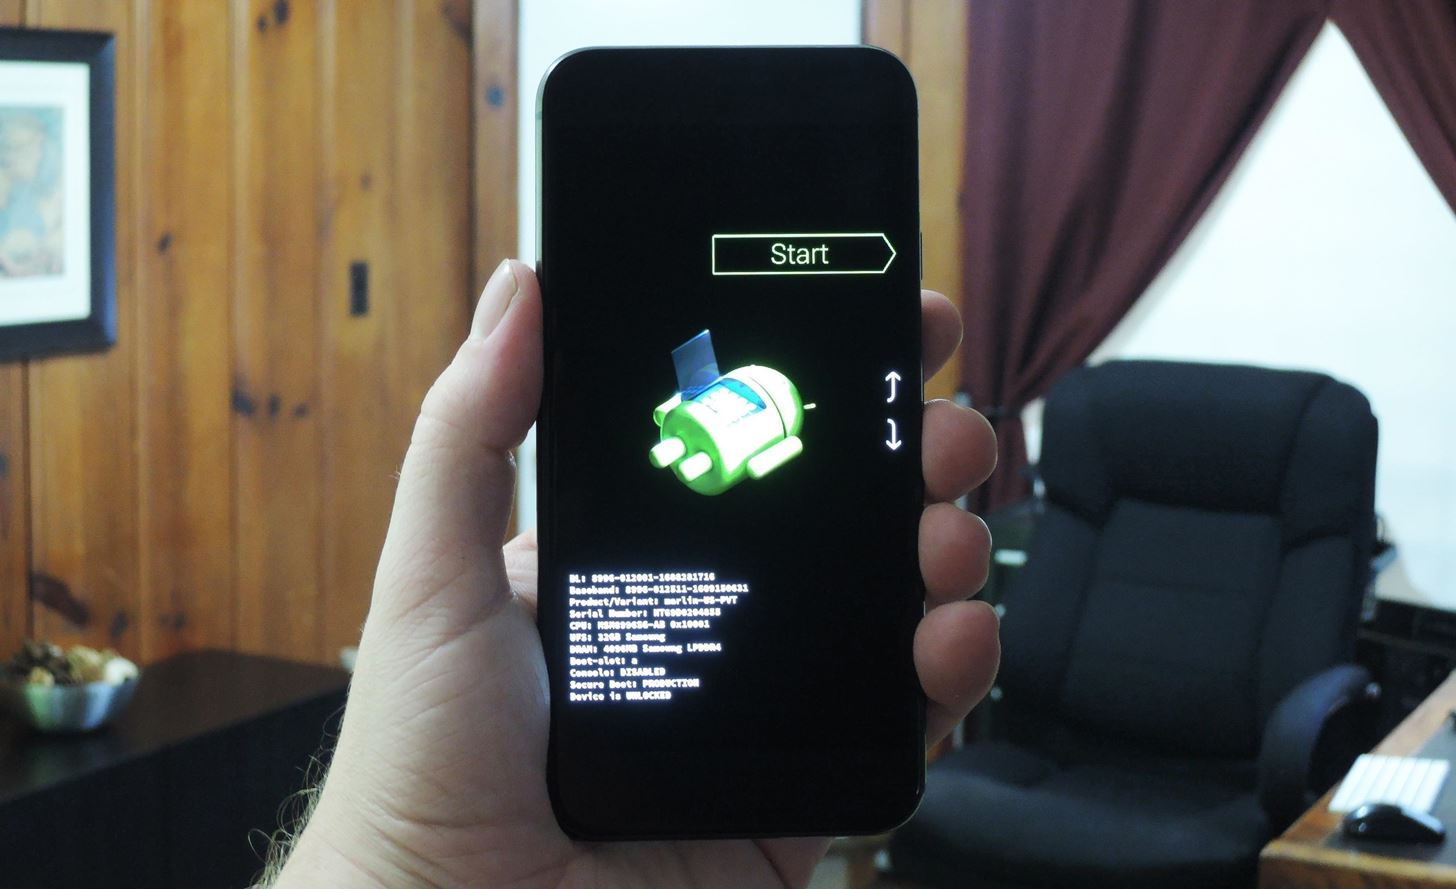
Step 3: Put Your Phone into Bootloader ModeIn order to run any Fastboot commands, your phone or tablet will need to be in bootloader mode. This process will vary depending on your device.For most phones, start by powering your device completely off. When the screen goes black, press and hold the volume down and power buttons simultaneously, and keep holding them for about 10 seconds.If that doesn't work, turn the phone off, then press and hold the volume down button. From there plug a USB data cable into your PC, then simply wait a few seconds.If that still didn't work, try repeating the USB cable method, but this time use the volume up button.Within moments, you should be greeted by Android's Bootloader menu, which should look something like this: Bootloader mode on the Pixel XL. Image by Dallas Thomas/Gadget Hacks When you see this screen, make sure your phone or tablet is plugged into your computer with a USB data cable. Aside from that, leave the device alone, as the rest of the work will be done on the computer side of things.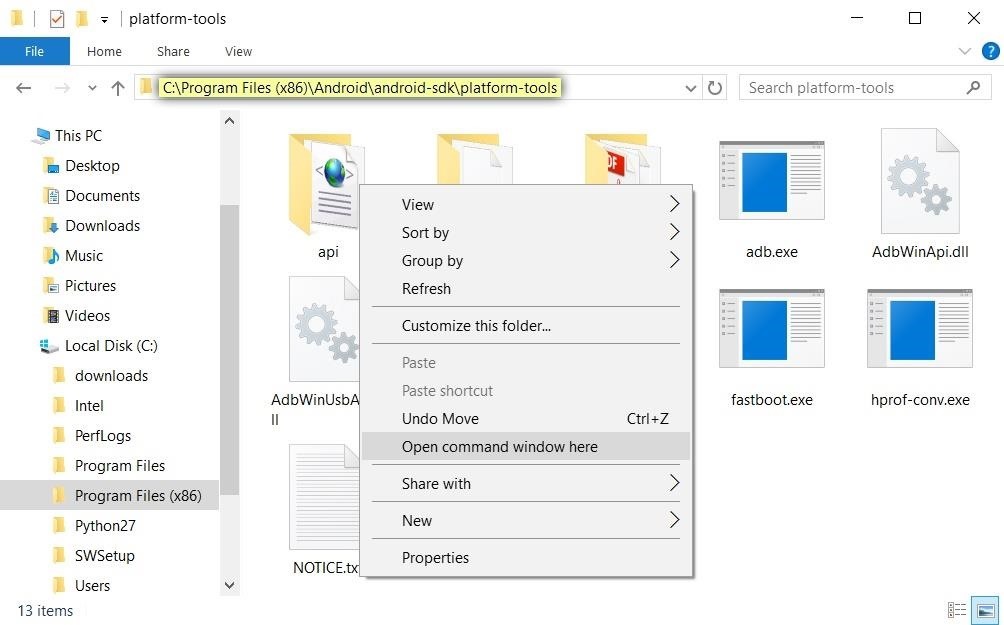
Step 4: Open an ADB Shell on Your ComputerNavigate to the ADB and Fastboot installation directory on your computer. For Windows users, this can usually be found at C:\Program Files (x86)\Android\android-sdk\platform-tools. For Mac and Linux users, it depends on where you extracted your ADB folder when you installed the utility, so search your hard drive for the platform-tools folder if you've forgotten.From here, if you're using a Windows PC, hold down the shift button on your keyboard, then right-click any empty space and choose "Open command window here." For Mac and Linux users, simply open a Terminal window, then change directories to the platform-tools folder inside of your ADB installation directory.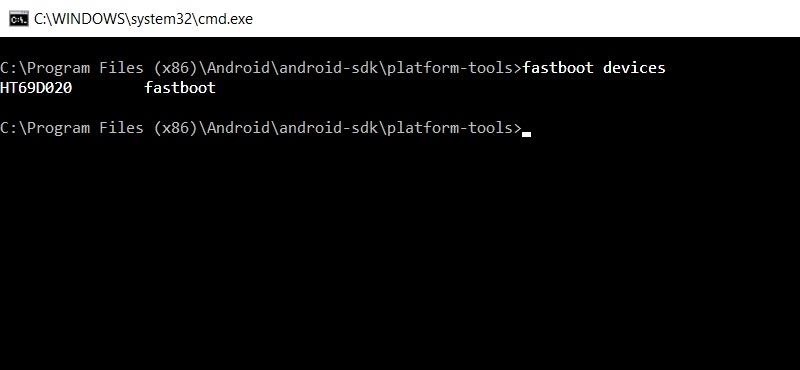
Step 5: Unlock the BootloaderThis next step is something you only need to do once, so if your bootloader is already unlocked, you can skip ahead. Otherwise, you'll need to run a single Fastboot command—but note that this will wipe all data on your device.Before we get into this part, note that I'll be listing the commands for Windows users. Mac users will have to add a period and a slash (./) before each of these commands, and Linux users will have to add a slash (/) to the front.So from the ADB shell, type the following command, then hit enter.fastboot devices If that returns a series of letters and numbers followed by the word "fastboot," then your device is connected properly and you're good to go. Otherwise, refer back to Step 1 to check your ADB and Fastboot installation, and ensure that your device is in bootloader mode as shown in Step 3. Next up, it's time to unlock your bootloader. Depending on the Android version your device shipped with, this will be done in one of two ways.So if your device shipped with Lollipop or lower pre-installed, enter the following command:fastboot oem unlock If your device shipped with Marshmallow or higher, type the following command, then hit enter:fastboot flashing unlock Sending the bootloader unlock command to a device that shipped with Marshmallow or higher. At this point, you'll see a message on your Android device asking if you're sure you'd like to unlock the bootloader. Make sure the "Yes" option is highlighted, and if it's not, use your volume keys to do so. From there, press the power button, then your bootloader will unlock and your phone will reboot back into Fastboot mode. Bootloader-unlock screen on the Nexus 6P. Image by Dallas Thomas/Gadget Hacks
Step 6: Download the Factory ImagesNow that your bootloader is unlocked, you're ready to start flashing factory images—but first, you'll have to download the actual images themselves. Below are some links to download the factory images package for common devices.Factory images for Nexus or Pixel devices Factory images for HTC devices Factory images for Motorola devices Factor images for OnePlus devices Factory images for Essential devices With each of the above links, simply locate your device model in the list, then download the latest available firmware on your computer. If your manufacturer is not listed here, try Googling "factory images for <phone name>."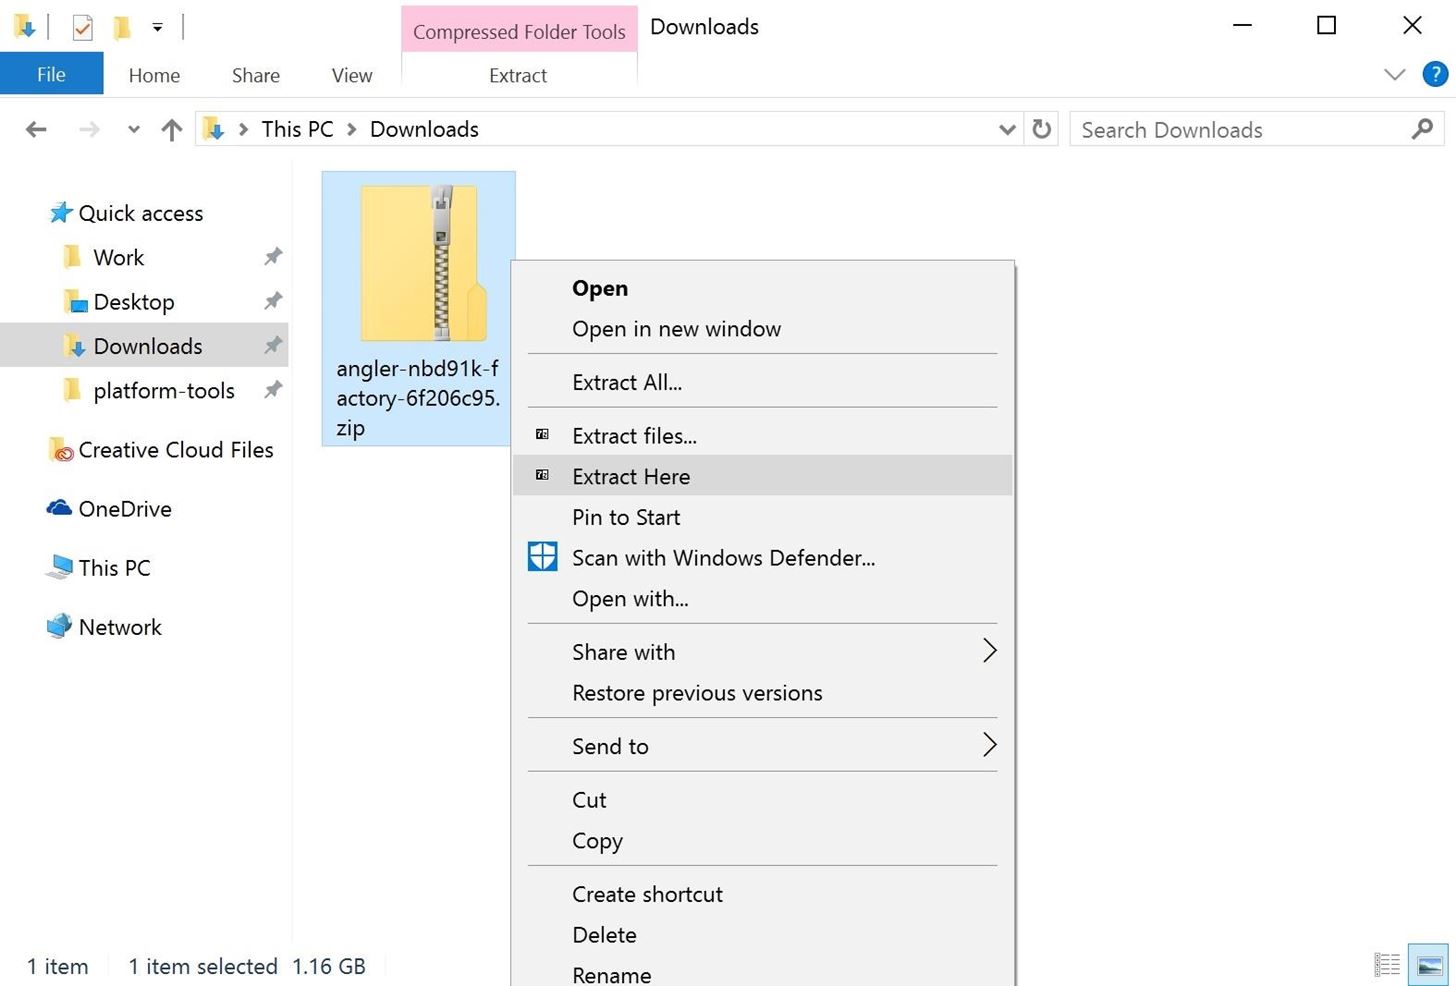
Step 7: Flash the Factory ImagesNow it's time to flash the images. The first thing you'll want to do here is extract the factory images archive that you downloaded from your manufacturer's website. For that part, I'd recommend using 7-Zip, as it's free and works with most archive formats. Extracting the factory images archive. Next, move all of the contents of the archive to the platform-tools folder inside of your ADB installation directory, then open an ADB Shell window in this folder. For more information on that, refer back to Step 4 above. Factory image files transferred to the platform-tools folder. Aside from that, there are two different approaches you can take when flashing the images. I'll outline both of them in separate sections below.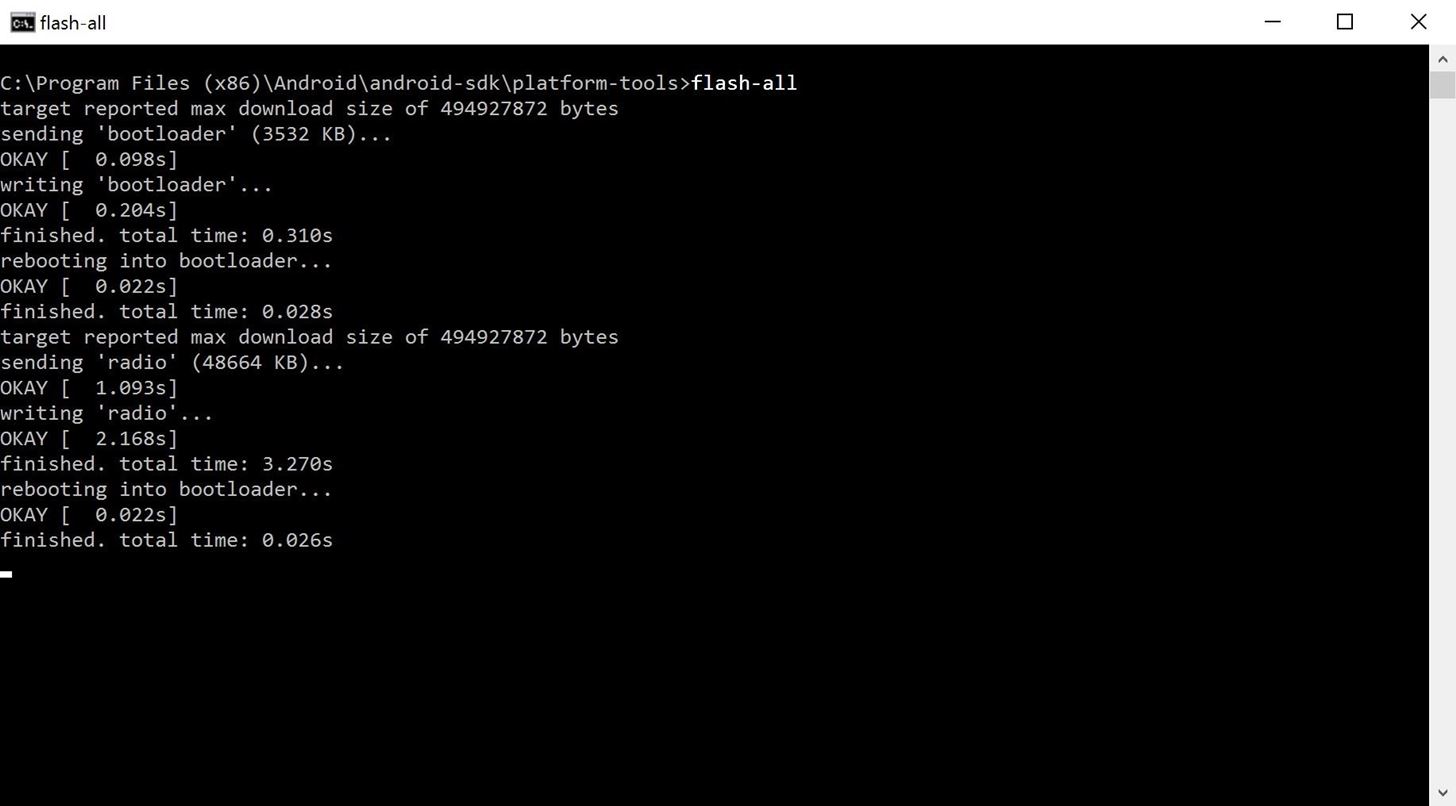
Option 1: Use the Flash-All ScriptMost factory images packages will contain a "flash-all" script that applies all of the images in one fell swoop. If you're trying to recover your device from a soft brick, this is the simplest way to go. However, it will unroot your device and wipe all existing data, so if you'd rather avoid that, see Option 2 below.But to run the flash-all script, type the following line into the command prompt, then hit enter:flash-all Sending the "flash-all" command. The process will take a few minutes, but when it's done, your phone should automatically reboot and you'll be running complete, 100% stock firmware.
Option 2: Extract the Images & Flash Them IndividuallyFor a second option, you can flash the system images individually. This method takes some extra work, but it can be used to un-root, update, or un-brick your device without losing existing data.Start by extracting any additional archives from the factory images package. Sometimes, factory images packages can contain a series of three or four nested archives, so make sure to unzip all of them. From there, copy all of the image files to the main platform-tools folder—in other words, don't leave them in any sub-folders. All images extracted from factory images package into platform-tools folder. From here, there are two images that you can get rid of: cache.img and userdata.img. These are the images that will overwrite your data and cache with blank space, so if you don't flash them, your existing data will remain intact.Of the remaining images, six make up the core elements of Android: boot, bootloader, radio, recovery, system, and vendor.The boot image contains the kernel, so if you just want to get rid of a custom kernel that's causing issues with your device, you only have to flash this one. To do that, type the following command into the ADB shell window:fastboot flash boot <boot image file name>.img Next is the bootloader image—this is the the interface that you're using to flash images with Fastboot commands. So to update your bootloader, type:fastboot flash bootloader <bootloader image file name>.img Once you've done that, you should reload the bootloader so that you can continue flashing images on the newer version. To do that, type:fastboot reboot-bootloader After that, we have the radio image. This one controls connectivity on your device, so if you're having problems with Wi-Fi or mobile data, or if you just want to update your radio, type:fastboot flash radio <radio image file name>.img Then there's recovery. This is something you may or may not want to flash, depending on the modifications you've made. For example, if you've installed TWRP custom recovery, flashing this image will overwrite your modification and replace it with the stock recovery interface. So if you're just updating your modded device, you should skip this one. Otherwise, if you plan to keep your phone stock and want the newer version of stock recovery, type:fastboot flash recovery <recovery file name>.img Next up is the big one: The system image. This one contains all of the files that make up the actual Android OS. As such, it's the most essential part of any update.However you may not be updating your phone. You may just be re-flashing the stock firmware to recover from a soft brick. If this is the case, the system image is often the only image you need to flash in order to fix everything, because it contains the entirety of Android. In other words, if you flash this image and nothing else, it will undo any changes you made with root access and put everything back the way it was.So as a cure-all in most soft brick situations, or as a method for getting the core part of an Android update, type:fastboot flash system <system file name>.img Finally, there's the vendor image. This is only present on newer phones, so don't worry if it's not in your factory images package. But if it's there, it contains a few important files, so type the following line to get this partition updated:fastboot flash vendor <vendor file name>.img After you've sent any or all of the above commands, you'll be ready to restart your device and boot into Android. To do that, type:fastboot reboot Flashing the factory images individually. At this point, your device should be fully updated, or if you were trying to recover from a soft brick, it should be running flawlessly. And since you now know what each of the core system images actually does, you'll have a better sense of how Android works going forward.Flashing factory images individually has helped me understand more about Android than any other mod or process. If you think about it, Android is just a series of images written to flash storage, and now that you've dealt with each of them individually, you should be able to identify and resolve root-related issues a lot easier.Follow Gadget Hacks on Facebook, Twitter, Google+, and YouTube Follow Android Hacks on Facebook, Twitter, and Pinterest Follow WonderHowTo on Facebook, Twitter, Pinterest, and Google+
Cover photo and screenshots by Dallas Thomas/Gadget Hacks
This video shows a few of the methods I use to cut copper clad printed circuit board material (PCB) for my homebrew, breadboard and prototype circuit construction. These methods include using
How to Cut a circuit board « Hacks, Mods & Circuitry
How To: Turn Any Ammo Box into an Awesome Set of Portable Speakers How To: Chrome's Download Bar Is Useless—This Extension Is the Fix You Need How To: Make a Smartphone Projector for Less Than $5 News: This Hack Turns Your iPad into a Multi-Window Multitasking Powerhouse for $10
How to Add the Simple iOS-Style Multitasking Bar to Mac OS X
If you have forgotten your password and can no longer access your Gmail account, here are a few quick steps to recover your account. Google Account Recovery. Go to Google's Account Recovery page and select "I don't know my password". Then enter your Gmail email address and click on Continue: It will prompt you for the recovery.
Forgot Password - Help Center
How to Turn Your Own Photos into 3D Wallpapers for Android
Unroot and Restore Galaxy back to Stock using Samsung Odin There are various reasons for one to continue flashing different files to the system. But there could also be several reasons for one to restore the official firmware on the device.
How To Unroot & Restore Stock Firmware On Samsung Galaxy S5
Play Farmville for iPad is now a reality! If you were ever wondering how to play Farmville for iPad, now you can! With the Virtual-Browser for Chrome App, playFarmville for iPad is finally possible! Virtual-Browser for Chrome App opens up a huge range of apps and games - like play Farmville for iPad - that you can use from your tablet:
How to Add Favorites on WhatsApp. WhatsApp for iPhone adds all of the contacts that also use WhatsApp to your Favorites list. You can add additional contacts to this list as well, but you'll be limited to inviting them to WhatsApp.
Use Your Computer to Send & Receive WhatsApp Messages Faster
The raise to wake and tap to wake features are enabled by default, but still make sure that those are on. A good habit to make to increase the speed of Face ID is to always have your thumb or finger hovering over the bottom of the screen before waking the iPhone X, so that way it's always ready to swipe.
The iPhone X's Face ID is only slower if you use it the wrong
#1 On Computer using Google Chrome Browser. The best way to at IMDB and rotten tomatoes rating to Netflix is by using google chrome to watch all Netflix programs. I am saying that because, then you can use a simple chrome plugin that will help you in rating any of the netflix media by imdb or rotten tomatoes rating.
Add IMDB and Rotten Tomatoes Ratings to Your Netflix with
How To: Use Yelp Collections to Find New Places & Keep Your Bookmarked Locations More Organized How To: Report to Yelp Wrong Hours, Addresses, Numbers & Other Incorrect Business Listing Information How To: View & Leave Tips on Yelp (& Why It's Important) How To: Get Your Lost Item Back from an Uber Driver (& What to Do if They Don't Respond)
How to Create & Access Location Bookmarks on Your Galaxy Note
Download Any Video from Chrome Where Download Link May Not Be
Four Isn't Enough: How to Add an Extra Application to Your iPhone or iPad Dock How To: Get Your Regular Dock Icons Back on Android Pie's Multitasking Screen How To: Get the Pixel 2's New Google Search Widget in the Dock Using Nova Launcher
4 handy options for adding storage to your iPhone or iPad
0 comments:
Post a Comment